TradingView Paper Trading: How to Set It Up for Futures
Switching the simulator on takes about a minute. Setting it up so the fills are actually real takes a bit more, and that second part is the one most people skip.
Published August 6, 2026
TradingView has a paper trading account built into the charts. It's free, it's already in your account whether you've noticed it or not, and it lets you place orders on ES, NQ, RTY, YM or anything else you can chart, then keeps a trade history you can review.
This guide covers the whole setup in four steps, and then the things that go wrong afterwards. Step three is the one that matters most for futures, because by default the simulator is filling you against prices that are ten minutes old.
What You'll End Up With
A working paper trading account on your futures chart, a balance that matches what you'd actually fund, commission switched on so the numbers are net rather than gross, and real-time CME data so the fills reflect the market instead of a delayed copy of it. The simulator is free, the data isn't, and the realistic setup costs roughly twenty euros a month: a paid TradingView plan, because data add-ons aren't sold on the free tier, plus the CME Group package on top.
Open the Simulator
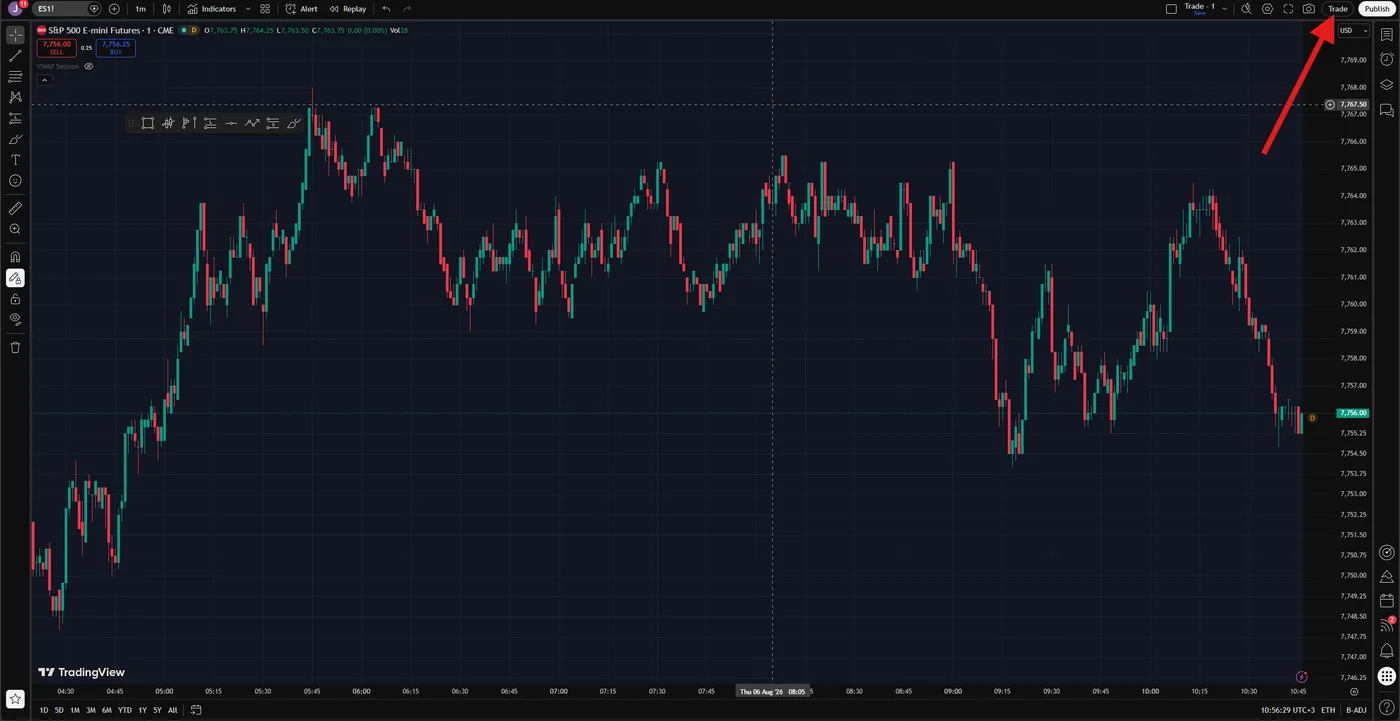
Load the contract you want to trade first. For the E-mini S&P that's ES1! if you want the continuous front month, or the specific contract month if you'd rather chart that directly. Then find the Trade button in the top right of the chart, next to Publish.
That opens a panel listing every broker TradingView connects to. The one you want is the first tile, labelled Paper Trading and described as the brokerage simulator by TradingView. Everything else in that window is a live broker connection to a real account with real money.
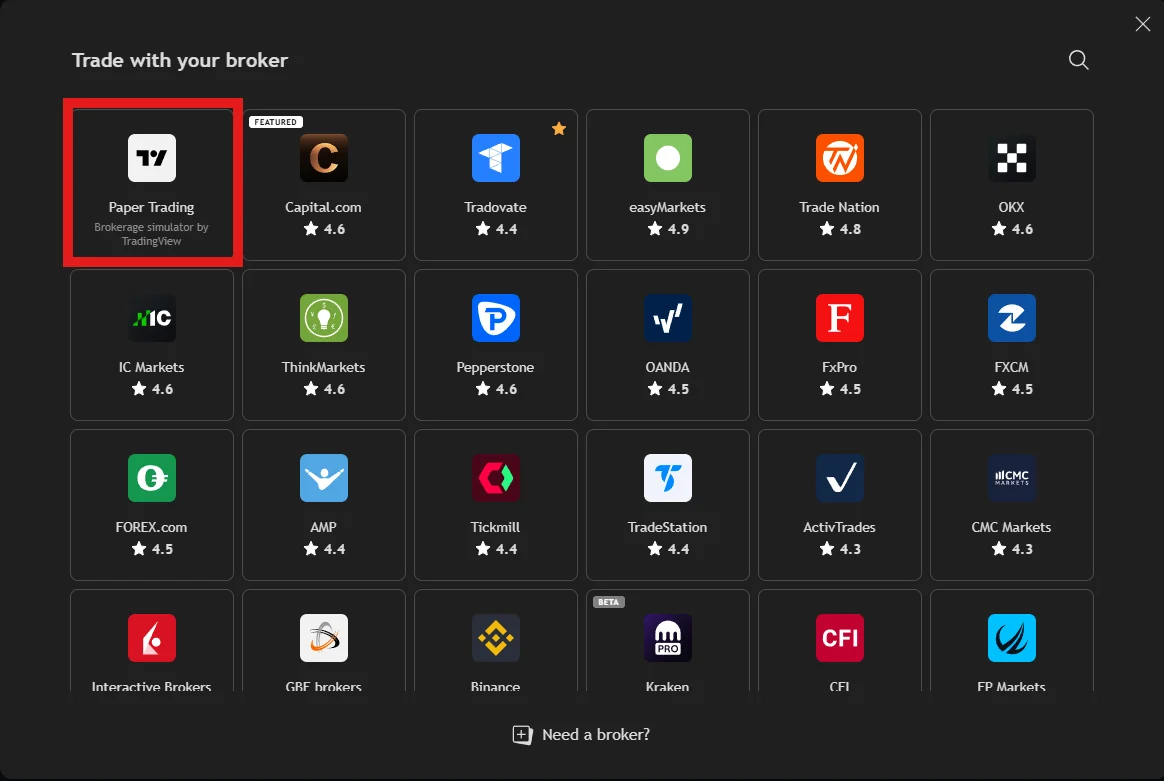
Click it and the trading panel opens along the bottom of the chart, with buy and sell buttons appearing on the chart itself. You now have a working simulator.
Set a Balance You'd Actually Fund
The paper account arrives with $100,000 in it, which is a great deal more than most people are going to open a real futures account with. Change it before you take a single trade.
Account size decides how many contracts you can carry, and four contracts in a simulator holding a hundred thousand dollars builds habits that will empty a five thousand dollar live account inside a fortnight. If you're starting small, or working towards a prop firm evaluation, set the sim to that number and live with the same constraint.
Changing the balance
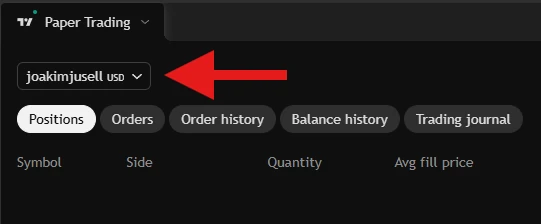
Start in the trading panel and click your account name, the dropdown showing your username and currency.
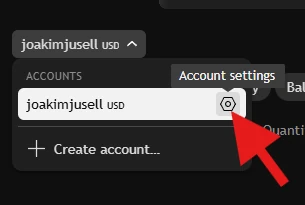
Hover the account in that list and a gear icon appears on the right, labelled Account settings.
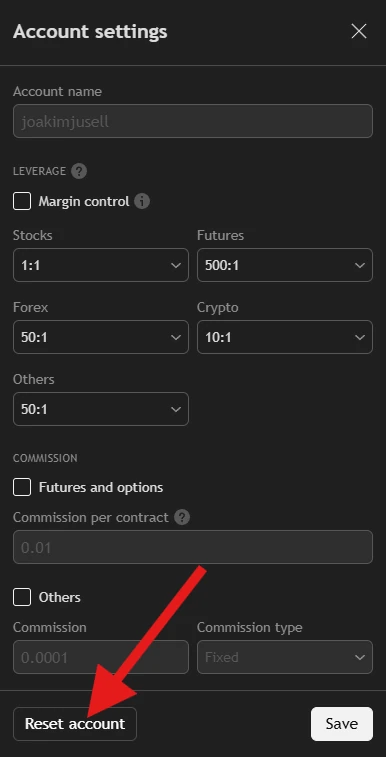
That panel holds the leverage and commission settings, which I'll come back to in a second. The balance itself lives behind Reset account at the bottom left.
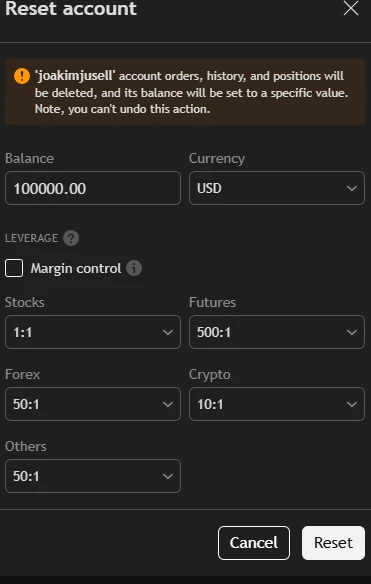
Reset account is where you set the number. Type the balance you'd actually fund, confirm the currency, and hit Reset.
Resetting wipes your history
The dialog warns you plainly: orders, history and positions are deleted and the action can't be undone. So set your balance on day one rather than after thirty trades, because doing it later costs you the trade history you were building. If you've already got trades worth keeping, export or screenshot them before you reset.
Turn commission on while you're in there
The Account settings panel has a Commission section, with a checkbox for futures and options and a field for commission per contract. It's switched off by default, which is why so many people end up with sim results that look better than anything they'll produce live.
Tick it and enter what your broker actually charges per contract per side. On micros in particular, commission is a meaningful share of the move you're trying to capture, and a scalping strategy that works with fees switched off can be a losing business with them switched on. This one checkbox is the difference between a sim that flatters you and one that tells you the truth.
A note on margin control
The same panel has Margin control, unchecked by default, with futures leverage sitting at 500:1. With it off, the simulator won't stop you taking a position size your real account could never hold, and it won't margin call you either. If you want the sim to enforce the same limits your broker will, turn it on and set the leverage to something realistic.
If you're not sure what your risk per trade should be in the first place, work it out before you set any of this. My futures position size calculator sizes a trade against the real volatility of each contract, and the risk management guide covers the rules worth having in place before you start clicking.
Fix the Data, or the Fills Are Fiction
This is the step that decides whether the whole exercise is worth anything, and it's the one nobody mentions.
TradingView doesn't own the market data it shows you. It licenses it from the exchanges, and the exchanges charge for real-time access. CME Group, which runs the contracts most futures day traders care about, offers its feed free on a ten minute delay or live for a monthly fee. On a free TradingView account you're on the delayed version.
The paper trading engine fills your orders against whatever your chart feed is showing. So on delayed data, you click buy on a price the market left ten minutes ago, and the engine fills you somewhere else entirely.
Ten minutes on a daily chart is nothing. On the five minute chart most people day trade it's two entire bars, and on the one minute chart it's ten bars you cannot see. On a normal day ES travels several points in that window, and on a fast one it travels a great deal more.
Check whether your data is delayed
TradingView marks delayed instruments with a small D badge, and it shows up in two places: in the chart legend next to the contract name, and again on the price axis beside the last price.
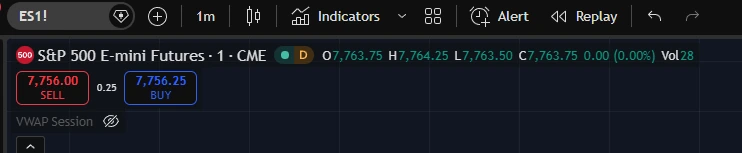
Two other quick checks if you want to be certain. Put a live quote from your broker beside the chart and compare the last price. Or watch the timestamp on the most recent bar during the cash session, because a live one minute feed prints a new bar every minute.
What the real-time feed costs
| Data source | Free tier | Real-time, non-professional | Real-time, professional |
|---|---|---|---|
| CME Group (CME, CBOT, COMEX, NYMEX, E-minis included) | 10 min delay | €7.00 / month | €548.00 / month |
| NASDAQ Global Index Data Service | 15 min delay | €5.00 / month | Not offered |
| US Stock Markets bundle (NYSE, NASDAQ, Arca, OTC) | Varies | €9.95 / month | Not offered |
Those are the figures shown in my own account and TradingView bills in your local currency, so check the current numbers on the CME data page before you buy.
The two purchases
People routinely make only the first of these and then wonder why nothing changed.
| What you buy | Cost | Why you need it |
|---|---|---|
| A paid TradingView plan, Essential or higher | €12.95 / month | Real-time exchange data add-ons aren't sold on the free tier. Essential is the cheapest plan that lets you buy one, billed annually. |
| CME Group real-time data, non-professional | €7.00 / month | This is the piece that actually removes the delay. Covers CME, CBOT, COMEX and NYMEX, with the E-minis included. |
Essential is the one to pick unless you want the extra charts and indicators the higher tiers offer. For fixing your fills, the plan is a gate you pass through to reach the data subscription, and the cheapest one clears it.
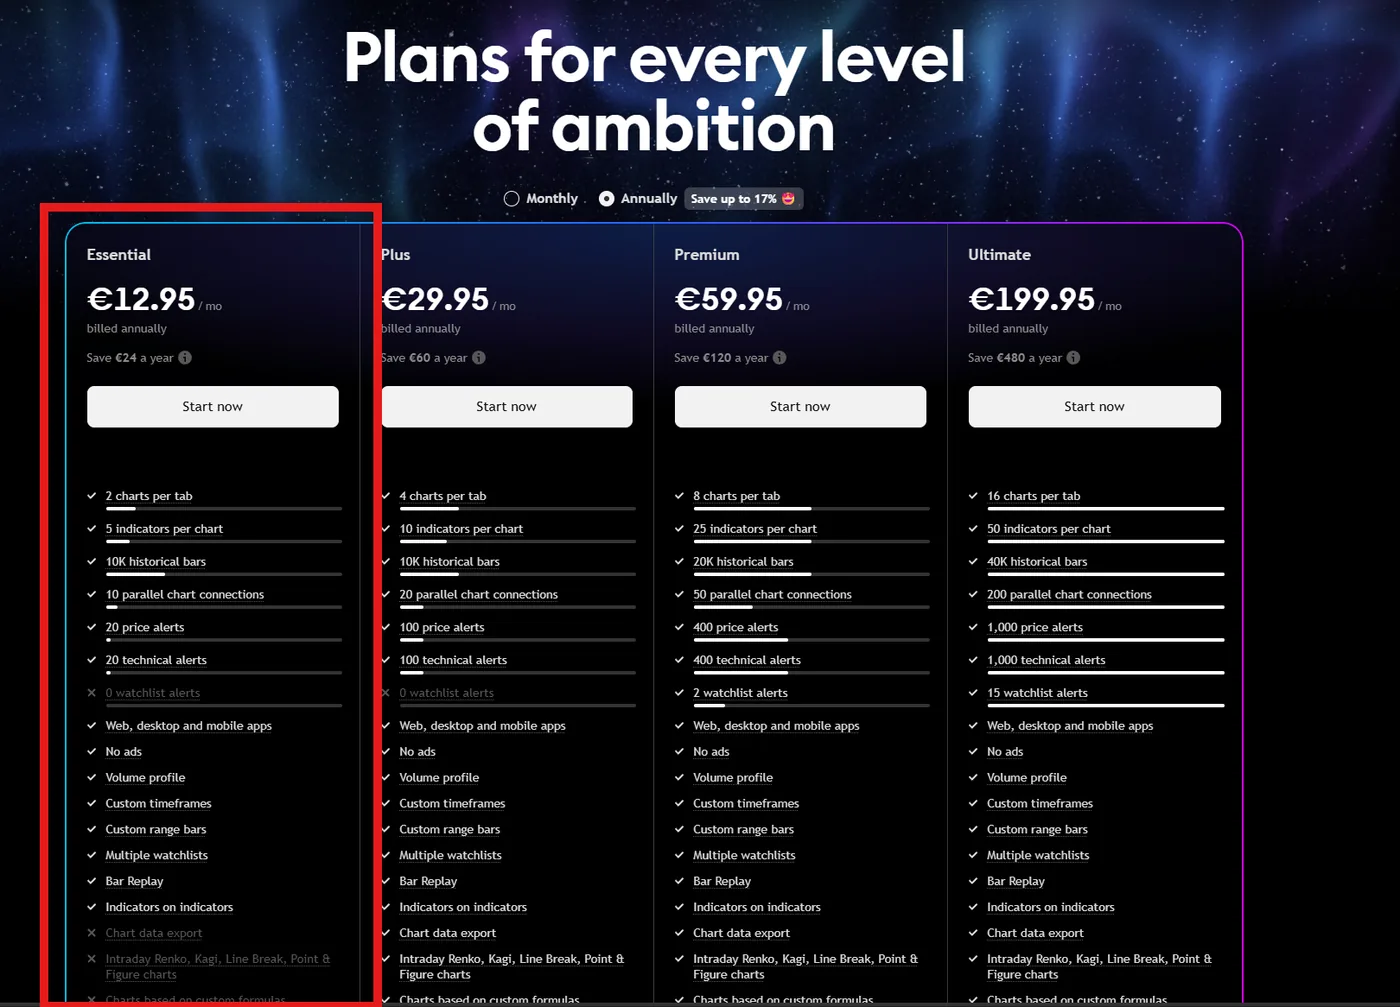
With a plan active, the second purchase happens on the CME Group data page. It isn't linked from anywhere obvious inside the charts, so here it is directly.
The subscribe button is on that page. You need an active paid plan on the account first, otherwise the option to buy won't appear at all.
The €7.00 price is stated on that page as being for non-professional subscribers only.
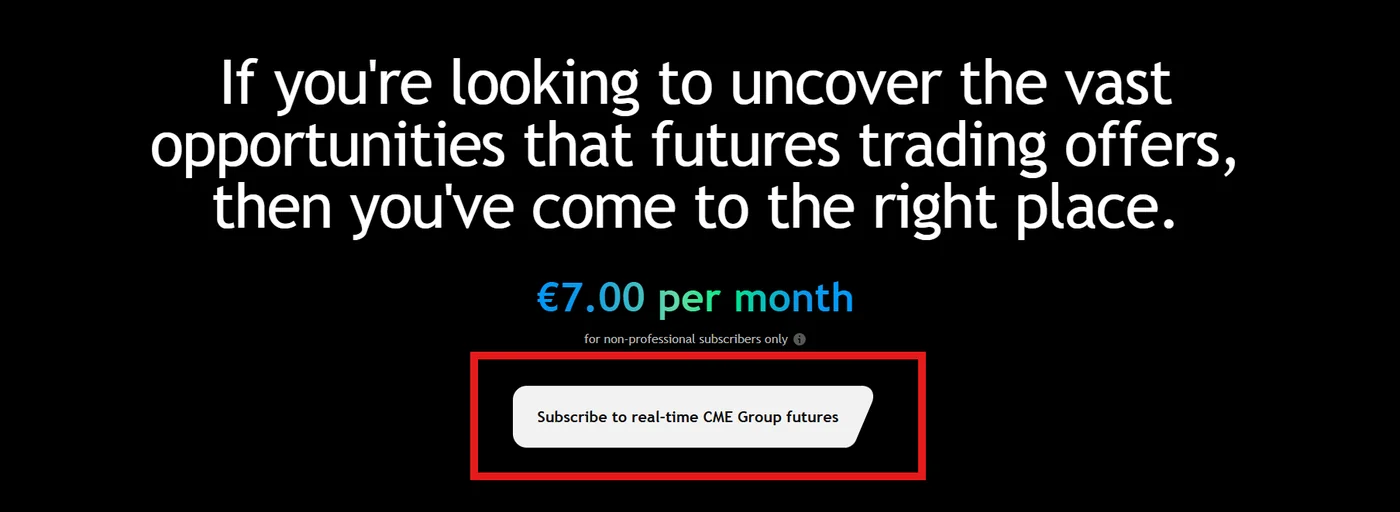
Around twenty euros a month for both. Set that against a single badly sized ES trade and the argument makes itself.
Answer the professional status question honestly
CME charges non-professional users €7 a month and professional users €548. The definition covers things like trading on behalf of others, being registered with a regulator, or using the data for a business rather than your own account. Most people reading this are non-professional and can tick that box in good conscience. If you're genuinely in the professional category, declaring otherwise is exchange fraud, and the exchanges do audit it.
One thing worth checking before you spend anything: your futures broker may already include a real-time CME feed with your account. If so you may be about to pay twice, and it's worth deciding which chart you actually want to trade from.
Place Your First Order
With the panel connected, buy and sell buttons appear on the chart showing the current bid and ask, and you can also place orders from the trading panel at the bottom or by right clicking a price level.
Set the quantity to what your account size actually justifies rather than what the sim will let you get away with. One contract, held properly, teaches you more than four contracts you'd never carry live.
When Orders Misbehave
Delayed data explains most complaints about paper trading, and if you completed step three you've already dealt with it. Here's the rest of the list.
| Symptom | Usual cause | Fix |
|---|---|---|
| Fills land several points from where you clicked | Delayed data feed. | Check for the D badge and buy the real-time CME package, covered in step three. |
| Orders rejected, "not enough funds" | The paper account has a fixed balance and futures margin is charged against it. A few oversized positions exhaust it. | Reset the balance in the trading panel settings, then size the way you would live. |
| Limit orders never fill | The simulator generally needs price to trade through your limit, not merely touch it once. | This one is closer to reality than it looks. A real limit order at the back of a queue often doesn't fill on a single touch either. |
| Chart is dead, nothing is moving | Expired contract month. You're watching a symbol that stopped being the front month weeks ago. | Switch to the current front month or use the continuous contract for charting. Roll when volume crosses over rather than on the calendar date. |
| Panel won't connect | Browser session, extension conflict, or an outage on TradingView's side. | Log out and back in, disable extensions, and check their status page before assuming it's you. |
The expired contract one catches more futures beginners than anything else on that list. If contract months and rollover are new to you, my guide to trading ES futures covers the mechanics, and the micro futures guide does the same for the smaller contracts.
What the Simulator Still Won't Teach You
Set up properly, paper trading is genuinely useful. It teaches order mechanics, it lets you run a setup enough times to find out whether you can follow your own rules, and it builds a trade history worth reviewing. It still isn't live trading, and the gaps are worth naming.
None of that makes sim worthless. It makes sim a place to prove you can follow a process rather than a place to prove you have an edge. When somebody shows me a good paper trading month, my read is that they've earned the right to go live at the smallest size available, not that they're ready to scale.
If you're at the beginning of all this, how to start day trading walks through the order I'd learn things in, and the beginners guide covers the fundamentals underneath it.
Questions I Get About Paper Trading
Is TradingView paper trading free?
The simulator is free on every account including the free tier. The data behind it is what costs money. On a free account CME futures arrive on a ten minute delay, and because the simulator fills against your chart feed, those fills are based on prices the market has already left. Making it behave realistically means paying for real-time data, which needs a paid plan plus the CME data package.
Do I need a paid plan to paper trade futures on TradingView?
You can paper trade on a free account, but the fills will be based on ten minute delayed data. To buy the real-time CME data package you need a paid plan, and Essential is the cheapest one that allows it. A realistic futures sim setup is therefore a paid plan plus the CME data add-on, which comes to roughly twenty euros a month at the time of writing.
Why do my paper trades fill at a different price than I clicked?
Delayed data is the most common cause. Your chart shows a price from ten minutes ago, you send a market order against it, and the engine fills you wherever price actually is. Two other causes are worth checking: an expired contract month, which leaves you watching a symbol almost nobody is trading, and limit orders that require price to trade through your level rather than merely touch it. The ES futures guide covers how contract months and rollover work.
Is TradingView paper trading good enough to prove a strategy works?
It's good enough to prove a strategy is coherent and that you can follow rules. It isn't good enough to prove the edge survives contact with real money, because even on real-time data you get perfect fills, no slippage, no queue position and no emotional weight on the size you're carrying. Treat a good sim month as permission to go live at minimum size, and work out what that size should be with the position size calculator first.
Is all of this harder than it should be? Futures is a genuinely difficult market to learn on your own, between the data feeds, the contract months, the margin and the sizing, and most people are piecing it together from forum posts and guesswork. Bring whatever is tripping you up to the intro call and I'll tell you exactly what to fix.
Book Your Intro Session ($20)Continue learning: Trading Diagnostic • Futures Position Size Calculator • How to Trade ES Futures • Micro Futures Guide • How to Start Day Trading • Risk Management • ES Futures Statistics 2026 • All Free Resources